How To Grow Hot Peppers
Many people love to eat hot peppers as they can add wonderful flavor and heat to dishes. Some people don’t care for their peppers to be too spicy. Other’s like their food to bite back. The good news is there is a huge variety of peppers available that can satisfy almost any palate. So let’s talk about how to grow hot peppers.
Since there is such a large assortment of hot peppers to choose from, the first step will be pick what you want to grow. If you’re looking to save money then the obvious choice should be peppers you plan to eat. However there are many peppers you can grow that aren’t available in stores. This is another advantage of growing your own. The catch is, you may not know you like a type of pepper until you’ve tried it. What better excuse to plant a variety of peppers?!
If your desire is to grow hot peppers of the rare variety, you can find and buy many hot and/or sweet pepper seeds on the internet from places like this. But if you plan to grow more common peppers then you can simply buy them locally. Most places with garden centers sell common seeds.
With common peppers though, most farm and garden centers will also sell seedlings. Starting with seedlings will be much easier than starting from seeds. They are ready to transplant and you will also be much closer to reaping the benefits of the plant time wise. This will be more expensive however, as seed packets are much cheaper than seedlings.
Growing peppers from seeds can be difficult because it requires the right conditions. Sometimes those conditions can change from plant to plant as well. This is why if you are a beginner, we recommend using seedlings. There can be a lot of trial and error and mortality amongst seeds. It tends to be a numbers game. You’ll want to start many and transplant only the strongest ones.
Starting from Seeds
If trying to grow hot peppers from seeds is your best option then we suggest a well controlled environment, indoors, with plenty of light and warmth. The light can be artificial and you can buy warming mats for seedlings from many places online like eBay. Artificial lighting can get technical because you want a setup that mimics the sun’s natural light waves. Not just any bulb will do, and we encourage you to do some research when getting set up.
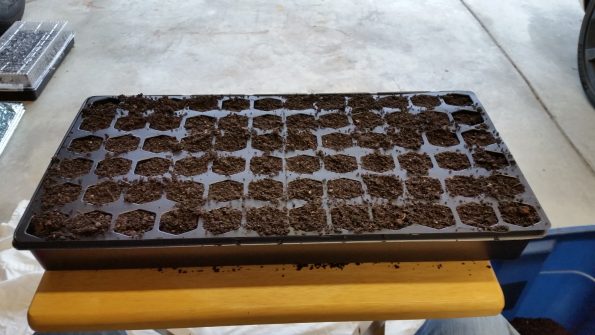
Next you will need seedling tray(s). You can find these at many retailers such as Lowes. These trays are practically mini green houses. They come with a bottom tray you can fill with water (about 1 knuckle deep) and a tray of plugs to set inside of it. Finally there is a clear plastic top piece that further traps the moisture and warmth inside which will help the seeds take off.
Ideally you should start your seeds with a seed starting soil mix. The mix is considered sterile and unused. This should give seeds their best chance at germinating and coming out strong. I don’t believe a seed starting mix is entirely necessary, so long as you are using fresh, fine garden soil. But avoid simply going out and gathering whatever is in your yard or reusing from other plants.
Liquid fertilizer may be necessary as your seeds are germinating because the soil will probably not have the nutrients they need. I personally premixed some of the Miracle Grow All Purpose Plant Food, found at many retailers, in the water I used to fill the bottom of the seed tray.
Plant the seeds according to the directions, usually a few per plug. After they’ve sprouted, you can thin the smaller, weaker sprouts. Don’t let the sprouts get too tall before you remove the plastic cover. If you want to check out my simple setup you can see it here.
Planting Decision
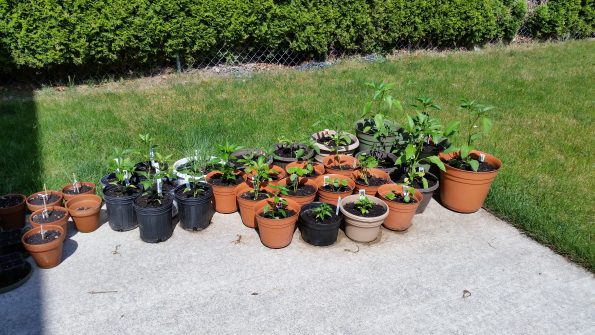
Once your seedlings are several inches tall with a strong root ball built up then you are ready to transplant. It can take a month or so to get to this point. If you buy seedlings ready to go, this is where you start. Next, decide if you want to grow in pots or in the ground. Obviously there are other methods to growing such as hydroponic. But for simplicity’s sake we’ll stick these two.
I personally believe that if you are a beginner, you will have better results trying to grow hot peppers in pots. Planting in pots is best because all you have to do is obtain the right size, fill it with good potting soil, and go. It’s pretty simple and well-draining pots usually aren’t very expensive.
Planting in the ground can work well too, however depending on where you live your soil may not be optimal for peppers or many other plants. This will require amending the soil with the proper mediums and necessary nutrients. This takes some knowledge, skill and work, all of which take time and effort. But it is very doable if you’re willing to learn.
Another advantage to planting peppers in pots is that it can be easy to separate any diseased or infested plants from others. Not to mention moving them to more sunny areas if need be. Or to individually optimize each pot per the plant’s specific needs. Just make sure to choose a pot that drains well. I’ve had a lot of luck reusing hanging flower pots.
As far as pot size goes, the bigger the pot the bigger your plant can grow. Growing bell pepper and others like poblano peppers will require bigger pots. Consider this, if the pepper itself is large, the plant will likely also need to grow large to produce. If you put a plant like this in a smaller container, your yield will also be smaller or not at all.
Also, whether planting in pots or the ground, make sure your plants get ample sunlight. Typically a South facing portion of your yard will work well (if you’re in the northern hemisphere like the US). Pepper plants need to enjoy about 6-8 hours worth of sunlight per day.
If you are planting in the ground, make sure to loosen up your soil before transplanting. You want to give the roots their best chance to slither deeper into the soil. This can be done simply with a hoe. But if you have a lot of space you’re planting in, such as a large grow bed, then renting a tiller may be a better option. I did that when building my grow bed last year. You can see that here.
Transplanting
Next step: transplanting. This step causes stress to your plants and should be done carefully and only once if you can help it. First, prepare your plant’s new home. In a soil filled pot or the ground, dig a small hole slightly deeper than your plant’s roots. Then, remove the plant from the plug tray and gently break up its roots to loosen them. Place in the hole and fill in the gaps with more soil. Try to add about ¼-½ inch above the original soil base line of the stalk. Then gently pat down the soil and water thoroughly.
Voila! You have successfully transplanted your seedling(s) and you are now amply prepared to grow hot peppers. In time you will enjoy the fruits of your labor. Don’t forget to water regularly. Different plants need different volumes of water, so be sure not to over water. If the tale is true, then well watered pepper plants will be less spicy than their thirstier counterparts. But I’m not entirely convinced this is true.
If you are having a problem with your plants leaning you can always prop them up. I usually use a wood bbq skewer. They are cheap but a thin, straight stick will also work. Just stake it down close (but not too close) to the stalk and loosely tie them together with a twist tie. Personally I stake every plant in the beginning because all it takes is some strong rain and wind to break a thin, young stalk.
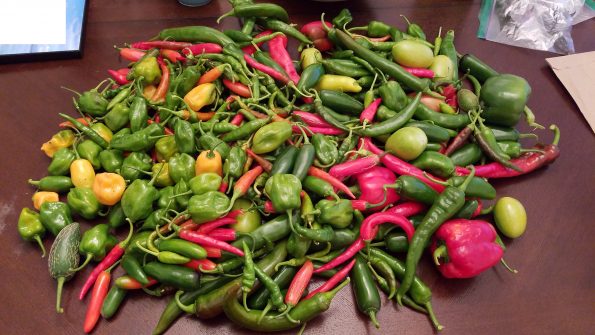
These peppers above are from my last major harvest towards the end of October last year. Just one harvest. There were lots more throughout the year though, starting early/mid summer. There’s quite a bit of variety, and even some tomatoes mixed in there.
Some of my favorite peppers are Jalapeno, Scotch Bonnet, Habanero, Cherry Bomb, Cayenne, Hungarian Hot, Thai, and Hatch Green Chili peppers. Living in Michigan can make it challenging to grow peppers. That’s mainly early and late in the season though, when there are colder temps and less light.
Many pepper plants are perennial, meaning they will come back year after year. But MI winters are brutal and if its get below freezing they’ll die. However if you live in a tropical climate, you could be in luck. One plant could give you years of great peppers.
Last year I tried to overwinter some strong producing jalapeno plants I had in pots. They were doing great and even beginning to sprout leaves in January/February. But I put them outside a little too early. All it took was one night getting below freezing and they were dead. And I was sad.
I have grown all of the peppers mentioned above and more with fair success. Not only has it been a joy for me to grow them, I have saved a lot of money on groceries over time too. There’s a lot you can do with peppers as well. I personally like to pickle or dehydrate them so they can be ground up to use in shakers. Some people even grow hot peppers to make pepper spray, an organic method of mammalian pest control.
One thing I can tell you from personal experience: what you grow yourself will taste far better than what you buy in stores. I know that probably sounds cliche but I have tried peppers I’ve grown and ones I’ve bought side by side and there’s no comparison.
There could be many reasons for this, but that’s another discussion. In my case these were jalapenos, which I eat nearly every day. One time I ran out and had to go buy more to make all the stuffed peppers I wanted. The ones I bought were almost gross.
I hope you were able to learn to grow hot peppers from this article. If you enjoyed it please share! Stick around for more tips on growing your own food to save money and be independent.